Title: A brief introduction of GnuPG
Created: 13 Feb 2025 Modified: 13 Feb 2025Description: This comprehensive guide explores GPG (GNU Privacy Guard), a powerful tool for secure communication and data protection. Learn about its history, how it works, and essential commands for key management, encryption, decryption, signing, and verification. Discover why GPG matters for both technical and personal use, and gain insights into the Web of Trust and key distribution methods.
Why GPG Matters
In today’s digital world, privacy is paramount, whether you’re a Linux system administrator, a software developer, or simply someone who wants to protect their personal information. GPG (GNU Privacy Guard) is a powerful tool that addresses these needs, offering a robust solution for securing communications and data. It’s a digital lock and key, safeguarding your sensitive information from prying eyes in a variety of contexts.
For Linux and Applications:
GPG plays a critical role in the Linux ecosystem and software development. It’s essential for:
- Software Package Management: Distributions like Debian and Ubuntu use GPG to sign software packages, ensuring that they haven’t been tampered with and come from a trusted source. This protects users from installing malicious software.
- Secure System Administration: System administrators can use GPG to encrypt configuration files, secure communication channels, and manage access to sensitive systems.
- Code Signing: Developers use GPG to sign their code, verifying its authenticity and ensuring its integrity. This is crucial for open-source projects and software releases.
- Secure Shell (SSH): GPG keys can be used with SSH for authentication, providing a more secure alternative to password-based login.
For Personal Usage:
Beyond its technical applications, GPG empowers individuals to protect their personal privacy:
- Email Security: Encrypt and sign emails to keep your conversations private and verify your identity. This prevents eavesdropping and phishing attacks.
- File Encryption: Secure sensitive files stored on your computer or in the cloud, protecting them from unauthorized access.
- Secure Messaging: While dedicated secure messaging apps exist, GPG can be used to encrypt messages exchanged through other platforms.
- Protecting Personal Data: Encrypt documents, photos, or any other digital information you want to keep private.
GPG is a versatile tool that bridges the gap between technical applications and personal privacy. Whether you’re managing a server or simply want to secure your personal emails, GPG offers a reliable and trusted solution.
In this post, I’ll be sharing the results of my own exploration of GPG. We’ll delve into the key concepts behind how GPG works, walk through some practical command-line examples, and I’ll also share some of my personal opinions on its usage and importance. My goal is to provide you with a clear and concise understanding of GPG, empowering you to take control of your digital privacy.
A Quick History of GPG
GPG’s story begins with Pretty Good Privacy (PGP), created by Phil Zimmermann in 1991. Driven by a strong belief in individual privacy rights, Zimmermann developed PGP as a response to growing concerns about government surveillance and the increasing vulnerability of digital communications.
Here’s a brief timeline of key events:
- 1991: Phil Zimmermann releases the first version of PGP.
- 1997: The OpenPGP standard is developed, providing a framework for interoperable PGP implementations. This was crucial for ensuring that different PGP programs could communicate with each other.
- 1999: The GNU Privacy Guard (GPG) is released as a free and open-source implementation of the OpenPGP standard. This made PGP technology accessible to a wider audience and fostered its adoption.
- 2000s - Present: GPG continues to be actively developed and maintained, with ongoing improvements to security, functionality, and usability. It remains a cornerstone of secure communication and data protection.
The development of the OpenPGP standard was a pivotal moment, as it allowed for the creation of multiple compatible implementations of PGP. GPG’s emergence as the free and open-source option was essential for democratizing access to secure communication tools. It ensured that individuals and organizations could benefit from strong encryption without relying on proprietary software.
How GPG Works (Simplified)
GPG’s power comes from its clever use of cryptography. Let’s break down the key concepts in two parts:
1. Encryption and Signing Mechanisms
GPG primarily uses asymmetric cryptography, also known as public-key cryptography. This involves two types of keys:
- Public Key: This key is like your publicly listed email address – you can share it freely. Anyone can use your public key to encrypt a message for you.
- Private Key: This key is like your email password – keep it secret! Only you have access to your private key, and it’s required to decrypt messages that were encrypted with your public key.
For a deeper dive into the technical details of how hybrid encryption (the method GPG commonly uses) works, you can check out this explanation: Hybrid Encryption in Ten Minutes.
Here’s a simplified illustration of both encryption and signing:
Encryption:
- Encryption: Someone wants to send you a secret message. They use your public key to encrypt the message. It’s now locked and can only be unlocked with your corresponding private key.
- Decryption: You receive the encrypted message. You use your private key to decrypt it, making the message readable again.
Signing:
- Signing: You want to send a message and prove that it’s really from you and hasn’t been tampered with. You use your private key to create a digital signature of the message.
- Verification: The recipient receives the message and the digital signature. They use your public key to verify the signature. If the signature is valid, they know the message is from you and hasn’t been changed.
This system ensures that only you can read messages encrypted with your public key. Even if someone intercepts the encrypted message, they can’t read it without your private key. Digital signatures, on the other hand, guarantee authenticity and integrity.
GPG also uses digital signatures to ensure message authenticity and integrity. When you sign a message with your private key, it creates a unique digital signature. Others can then verify this signature using your public key, confirming that the message came from you and hasn’t been tampered with. This is particularly important in Linux package management, where distributions like Debian and Ubuntu use GPG signatures to verify that software packages come from trusted sources and haven’t been corrupted. This protects users from installing malicious software.
2. Key Concepts and Components
GPG keys are more than just random numbers; they have several important components, which we can understand at three levels:
1. Local Key Management
This section covers the components involved in managing GPG keys on your local system.
-
Key Pair Generation: GPG uses asymmetric cryptography, employing a pair of keys (Main Key Pair): a public key for sharing and a private key for keeping secret. The
gpg --gen-keycommand generates this key pair. This main key pair serves as the foundation for your GPG identity and is used for certification purposes. It acts as the primary key, certifying User IDs (UIDs) and associated subkeys.UIDs are the information of the identity the Key referring to. It’s not restricted to only contain 1 UID. You could have more than one UID in a single GPG Key. You could also have a photo UID. The UID is signed by the Main Key Pair for ensuring the integrity and authenticity of the UID. This proves that the UID information is associated with the private key holder.
Subkeys are additional key pairs generated for specific purposes, such as signing, encryption, and authentication. Each subkey also has its own public and private key components. The subkey is signed by the Main Key Pair for ensuring the integrity and authenticity of the subkey. This proves that the subkey is associated with the main key pair and its owner.
A Keyring in GPG typically refers to the entire set:- Main Key Pair,
- its certified UIDs,
- Subkeys.
-
Key Properties:
Screen cap for
gpg --list-key --with-subkey-fingerprint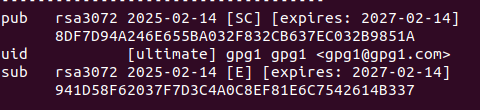
Decoded data
This section describes the key properties typically displayed when using the
gpg --list-key --with-subkey-fingerprintcommand. The following explanations correspond to the fields you’ll see in the output of this command.-
Fingerprint: The fingerprint is a short, unique identifier for your public key. It’s a “hash” of your public key, a fixed-length string of characters derived from the key. Crucially, the fingerprint is the most reliable way to verify that a public key truly belongs to the person you think it does. Always compare fingerprints when exchanging keys, preferably through a trusted channel. Each key pair (including the main key pair and all subkey pairs) has its own unique fingerprint. Based on the example output provided, the fingerprint for the main key pair is displayed on the second line:
8DF7D94A246E655BA032F832CB637EC032B9851A. You can also see that subkeys have their own fingerprints; for example, in the provided output, the subkey fingerprint is941D58F62037F7D3C4A0C8EF81E6C7542614B337. (Displayed as a long string of hexadecimal characters in the key listing.) -
Key ID: The Key ID is a shorter identifier for the public key. It is often a portion (e.g., the last 8 characters) of the fingerprint. Using the example fingerprint
8DF7D94A246E655BA032F832CB637EC032B9851A, the Key ID would be32B9851A. While it can be used to identify keys, it’s less reliable than fingerprints due to the possibility of collisions. Because Key IDs are shorter, it’s possible (though less likely with modern key sizes) for two different keys to have the same Key ID. This means you should never rely solely on the Key ID to verify a key’s authenticity. Always use the fingerprint. (Shown as part of the key listing, often the last 8 characters of the fingerprint.) -
Algorithm: The algorithm used to generate the key pair (e.g., RSA, ECC, Ed25519) and the key size are important parameters of a GPG key. The algorithm determines the mathematical basis of the key, while the key size affects the strength of the encryption (larger key sizes generally provide more security but can be slower). In the example output provided, the algorithm and key size for the main key pair are shown as
rsa3072, indicating an RSA key with a size of 3072 bits. Subkeys can also have different algorithms and key sizes. -
Created: The creation date of the key indicates when the key pair was generated. In the example output provided, the creation date for the main key pair is shown as
2025-02-14. This information is useful for understanding the age of the key. -
Capabilities: Capabilities define what a key (or subkey) can be used for.
-
Main Key Capabilities:
Signing: Used to create digital signatures.Encryption: Used to encrypt messages.Certification: Used to sign other keys (part of the Web of Trust).Authentication: Used to authenticate (e.g., in SSH).
-
Subkey Capabilities:
Signing: Used to create digital signatures.Encryption: Used to encrypt messages.Authentication: Used to authenticate (e.g., in SSH).
A key (or subkey) can have one or more of these capabilities. The main key must have the Certification capability and can optionally have Signing, Encryption, and Authentication capabilities (SCEA). Subkeys can have any combination of S, E, and A. For example, you might have a subkey specifically for signing and authentication, and another specifically for encryption. This enhances security by limiting the potential damage if a subkey is compromised. Capabilities are often indicated by letters like
S(sign),E(encrypt),C(certify),A(authenticate) in the key listing, and are shown within square brackets (e.g.,[SC],[SE],[SEA],[SCEA]). -
-
Expires: The expiration date of a key (or subkey) indicates when the key is no longer considered valid. Setting an expiration date is a good security practice, as it limits the window of opportunity for a compromised key to be misused. After the expiration date, the key should be considered invalid, even if it hasn’t been explicitly revoked. You can set expiration dates when generating keys or modify them later. In the example output provided, the expiration date is
2027-02-14. Expiration dates are displayed in the format[expires: YYYY-MM-DD]within the key listing, often preceded by the key’s capabilities (e.g.,[SC]). -
User ID (UID): The User ID (UID) identifies the key owner, typically a name and email address. A key can have multiple UIDs, useful for different email addresses or name variations. It’s signed by the main key pair to ensure its integrity and authenticity. In the example output provided, the name is
gpg1 gpg1and the email is[email protected]. (In the command output, this is displayed after theuidkeyword.) -
Trust: The trust level you have assigned to the key. This reflects how much you trust that the key actually belongs to the person or entity it claims to. Trust levels can vary (e.g., unknown, marginal, full, ultimate). This is a local trust setting. (Trust information is displayed in the key listing, often indicated by brackets like
[ultimate],[fully], etc.) -
Subkeys: Subkeys are separate key pairs linked to your primary key pair. They offer several security advantages: Isolation: If a subkey is compromised, your primary key (and other subkeys) remain safe. Specialization: You can create subkeys for specific purposes (e.g., one for signing, one for encryption), limiting the potential damage if a subkey is compromised. Key Management: You can more easily revoke or manage subkeys without affecting your primary key. Each subkey also has its own public and private key components and is signed by the main key pair for integrity and authenticity. (Subkey information is displayed separately in the command output, often with
subbefore the key ID.)
-


2. Key Distribution
Sharing your public key is essential for others to encrypt messages for you or verify your digital signatures. Here are the primary methods for distributing your GPG key, along with important security considerations for each:
-
Key Servers: Key servers are publicly accessible databases where you can upload and download public keys. They act as a central directory, making it easier to share your key with others and find the keys of people you want to communicate with securely. SKS keyservers are one type, but there are other key server networks as well (e.g., keyserver.ubuntu.com, pool.sks-keyservers.net).
-
Uploading Keys: You can upload your public key to a key server using the
gpg --keyserver <keyserver_url> --send-key <key_id>command. Replace<keyserver_url>with the address of the key server (e.g.,hkps://keys.openpgp.org) and<key_id>with your key ID. It’s often a good idea to upload your key to multiple key servers to increase its availability. -
Downloading Keys: You can download someone else’s public key using the
gpg --keyserver <keyserver_url> --recv-key <key_id>command. Again, replace<keyserver_url>and<key_id>with the appropriate values. -
Security: Even when downloading keys from official websites or repositories, it’s still best practice to verify the fingerprint if possible.
-
-
QR Codes: QR codes provide a convenient way to exchange public keys, especially on mobile devices. You can generate a QR code for your public key and share it with others. They can then scan the QR code to import your key into their keyring.
- Security: As with any other method, if possible, verify the fingerprint of the key received via QR code.
General Security Considerations (Applicable to All Methods):
-
Trust Levels and the Web of Trust: GPG uses a “Web of Trust” model, where you assign trust levels to the keys you have. If you trust a key, you are implicitly trusting the keys that that key has signed. This creates a network of trust. Understanding trust levels is essential for secure key management.
-
Key Revocation: If your private key is compromised, you should revoke the corresponding public key. This tells others that the key is no longer valid. You can generate a revocation certificate using
gpg --gen-revoke <key_id>and then distribute it through key servers or other channels. Revoking keys is a crucial part of maintaining security.
3. Web of Trust
The Web of Trust is a decentralized trust model used by GPG to establish the authenticity of public keys. It addresses the fundamental problem of ensuring that a public key you’ve obtained actually belongs to the person you want to communicate with. Key servers, while convenient, do not inherently guarantee the authenticity of the keys they host. The Web of Trust provides a way to build trust through personal verification and key signing.
-
Key Signatures: When you sign someone’s public key, you are digitally attesting to the fact that you have personally verified that the key belongs to the individual or entity it claims to represent. This creates a verifiable link between your key and their key. These key signatures from other users act as endorsements of a key’s validity.
-
Trust Levels: You assign a trust level to each key in your keyring. This reflects how much you trust that the key actually belongs to the person it claims to. Common trust levels include:
- Unknown: You have no information about the key or its owner.
- Marginal: You have some information, but you’re not entirely sure of the key’s authenticity.
- Fully: You have personally verified the key’s fingerprint and are confident in its authenticity.
- Ultimate: You have fully verified the key and also trust the owner to introduce you to other trusted keys.
Deciding on a trust level is a subjective process based on your own interactions and verification efforts. It’s crucial to verify fingerprints through a trusted channel before assigning a trust level.
-
Paths of Trust: Trust can propagate through the Web of Trust. For example, if you trust Alice “fully,” and Alice has signed Bob’s key, then you might also trust Bob’s key (depending on your trust level for Alice and the trust policy you’re using). This creates “paths of trust” that allow you to extend your trust network beyond the keys you’ve directly verified.
-
Limitations: While the Web of Trust is a powerful concept, it has limitations. It relies on individuals making informed trust decisions, which can be challenging. It’s important to remember that trust in the Web of Trust is subjective and based on your own evaluations.
-
Policy URL: A Policy URL can be associated with a key. This URL points to a document (often hosted on the key owner’s website) that explains the key owner’s key management practices. This policy document might describe how the key owner verifies identities before signing keys, their key revocation policy, and other relevant information that can help you make informed trust decisions.
Essential GPG Commands
Here are some essential GPG commands, categorized for easier reference:
Key Management:

-
List Keys:
gpg --list-keyslists your public keys.
gpg --list-secret-keyslists your private keys.
These commands are useful for viewing key IDs, fingerprints, user IDs, and other key properties. You can add--with-subkey-fingerprintoption to print all the fingerprint even for subkeys.Note: Your GPG keyring contains all the public keys you’ve imported, including keys from your friends, colleagues, and even unknown individuals.
gpg --list-keyswill therefore output a list of every public key in your keyring. These public keys allow you to encrypt messages or verify signatures from the corresponding key holders. You will likely see a large number of public keys, depending on how many people you interact with.gpg --list-secret-keyslists only your private keys. You will typically have only one or a few private keys (more than one if you’ve deliberately created separate keys for different groups of people). Your private key(s) are used to decrypt messages encrypted for you and to create digital signatures. It is essential that you keep your private keys secure. -
Generate Key Pair:
gpg --gen-keygenerates a new key pair (both public and private keys). This command will guide you through the process of choosing an algorithm, key size, setting an expiration date, and creating a passphrase to protect your private key. -
Add Subkey:
gpg --edit-key <key_id>followed byaddkeywithin the gpg command interface allows you to add a new subkey to an existing key pair. You’ll be prompted to choose the subkey’s capabilities (e.g., signing, encryption, authentication) and set an expiration date. Remember to save the changes withsave. -
Add User ID (UID):
gpg --edit-key <key_id>followed byadduidwithin the gpg command interface allows you to add a new user ID to an existing key. This is useful for associating multiple email addresses or names with your key. Remember to save the changes withsave. -
Change Trust:
gpg --edit-key <key_id>followed bytrustwithin the gpg command interface allows you to change the trust level you have assigned to a key. You’ll be prompted to select the desired trust level (e.g., unknown, marginal, fully, ultimately). Remember to save the changes withsave. -
Change Usage/Capabilities:
gpg --edit-key <key_id>followed byaddkeyorkey <subkey_number>within the gpg command interface allows you to change the capabilities of a subkey. Remember to save the changes withsave.

Encryption and Decryption:
-
Encrypt:
gpg --encrypt -r <recipient_key_id> <file>encrypts a file for a specific recipient. Replace<recipient_key_id>with the recipient’s key ID or email address. The encrypted file will have the.gpgextension. For multiple recipients, use the-rflag multiple times. For symmetric encryption (using a passphrase), use the-cflag. -
Decrypt:
gpg --decrypt <file>decrypts a file. GPG will prompt you for the passphrase to unlock your private key if necessary.
Signing and Verification:
-
Sign: GPG offers a couple of ways to sign files:
-
gpg --sign <file>creates an attached digital signature. The signature is embedded within the same file as the original data. This is convenient, but it modifies the original file. -
gpg --detach-sign <file>creates a detached digital signature. The signature is stored in a separate file (usually with a.sigextension). The original file remains unchanged. This is useful when you want to sign a file without modifying it, or when you want to distribute the signature separately from the file (e.g., on a different platform).gpg --clearsign <file>is a variation of detached signing that produces a human-readable cleartext signature block containing the signed data and the signature itself.gpg --armor --detach-sign <file>creates an armored detached signature, which is encoded in ASCII for easier transmission.
-
-
Verify:
gpg --verify <signature_file> <original_file>verifies a digital signature. For detached signatures, you need to specify both the signature file and the original file. However, if the original file is in the same directory and has the same base name as the signature file (e.g.,document.txt.siganddocument.txt),gpg --verify <signature_file>will automatically find it. For attached signatures, you only need to specify the signed file.
My Perspective on GPG
Despite its power and ubiquity in certain technical domains (like Linux package management), GPG remains surprisingly underutilized for personal use. This is likely due, in part, to a lack of clear and accessible documentation.
Much of the available material covers only very basic use cases or is unfortunately outdated, making it difficult for newcomers to fully grasp GPG’s potential. The Web of Trust, while a powerful concept, can be particularly confusing and challenging to implement effectively, even for those who have delved into its intricacies.
Despite these hurdles, I firmly believe that gaining a deeper understanding of GPG is invaluable. Since the release of PGP over 30 years ago, it has remained a top-tier tool for enhancing personal digital security.
While there are definitely areas where GPG could be more user-friendly, its core cryptographic strength and flexibility remain unmatched, making the effort to learn it well worthwhile.